To get the most out of your Grind Control™ coffee brewer we recommend using quality freshly roasted whole bean coffee & grind right before you brew. Coffee is at its peak flavor potential 5-20 days after roasting. Always buy coffee with a "Roasted On" date printed on the bag and avoid buying coffee with a "Best Before" or "Use By" date, as you never know when it was roasted. Coffee loses flavor and its aromatics once it's ground, so grinding right before you brew is the key to great tasting coffee with superior flavor and aroma.
Your Grind Control™ coffee brewer is the first drip coffee maker with an adjustable built-in grinder and calibration mode.
The adjustable grinder features machined stainless steel burrs that allow you to adjust the coarseness or fineness to optimize flavor balance.
The calibration mode allows you adjust the amount of coffee delivered on any strength/ cup size setting to suit coffee of varying grind size, origins, age and degree of roast, so you can achieve the maximum flavor potential from any coffee you choose.
The Grind Control™ also allows you to brew a single cup or travel mug in "cup" mode or from 2 to 12 cups in "carafe" mode.
Unpack all parts and accessories before removing and safely discarding all packaging material and promotional labels. Ensure the power cord is unplugged from the power outlet.
Wipe the exterior stainless steel housing with a soft, damp cloth. Wash the bean hopper and lid, coffee basket, gold tone filter and carafe in warm, soapy water and a soft cloth. Do not use abrasive cleansers, pads or cloths which can scratch the surface. Rinse and dry thoroughly.
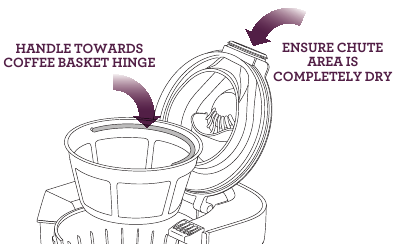
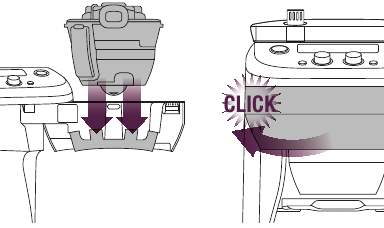
Close the coffee basket lid. Press the OPEN button to open the swing-out door. Attach the coffee basket to the swing-out door by ensuring the hinge area of the coffee basket is firmly seated in its most downward position on the two door hooks. Close the door until it clicks shut.
First Time Use Only
We recommend flushing the machine to remove any dust particles or residue from the manufacturing process. Follow the proceeding instructions, ensuring to completely fill the water tank. Step 1 (below), select '12 CUPS'. (Step 2, below) and the 'PRE-GROUND' coffee setting. (Step 4). However do not add any coffee to the coffee basket. Once the cycle is complete, discard the water from the carafe and repeat the cycle again for best results. The machine is now ready to use.
Press the flip-top lid to open. Pour the desired amount of cold, preferably filtered water into the tank using a jug or the provided carafe. Never use Distilled, De-mineralized or highly filtered water as this will affect the electronics and the taste of your coffee.
If using the carafe, ensure the carafe is clean and the carafe lid is securely locked in place. The LCD screen will indicate the amount of water in the tank as it is filled. The machine will beep when full and the water level float will rise to indicate the maximum level. Do not exceed the 12 cup maximum. Doing so may cause the carafe to overflow or water spillage at the back of the machine. Close the flip-top lid.
NOTE
Always ensure your carafe is clean before brewing. Residual coffee will affect the taste of your next cup.
NOTE
Check the water level on the LCD screen before use. We recommend always keeping the water tank full. The water tank should be refilled with cold, preferably filtered water. Never fill with de-mineralized water or any other liquid.
NOTE
Never pour water into the bean hopper or grinding chamber area. Doing so can cause the grinder to clog. Only re-commence use when the grinding chamber and grinding burrs are completely dry. Refer to Troubleshooting, 'Moisture clogging grinder'.
NOTE
Never fill the water tank once the coffee machine has started a brewing cycle. This will affect the volume dispensed into the carafe.
A warm carafe will help maintain the coffee's optimal temperature and keep coffee hotter for longer. Remove the carafe lid by turning counter-clockwise then lifting upwards.
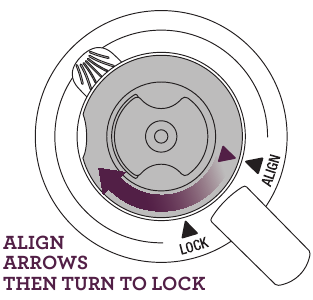
Fill the carafe with hot water and leave to stand for about 30 seconds then discard the water. To lock the carafe lid back into position, align the arrow on the carafe lid with the ALIGN arrow on the carafe. Turn clockwise until the arrow on the carafe lid aligns with the LOCK arrow on the carafe. This ensures that the lid is closed and in the proper position for brewing and pouring. Place the carafe into position under the drip stop outlet.
NOTE
Ensure the carafe is clean and completely empty and the lid is securely locked in place before placing under the drip stop outlet. Starting a brew cycle with water or coffee in the carafe will cause the carafe to over flow.
Press the CUP|CARAFE button. The LCD screen will display a Carafe symbol and the current number of cups selected. Rotate the CUP | CARAFE dial to select the required number of cups to brew. You can choose less than the current tank level (2 cup minimum), while the maximum is the amount of water in the tank, up to 12 cups. If you select cups greater than the level in the water tank, the LCD will display FILL TANK and the water tank symbol will flash.
There are 8 Strength settings. The LCD screen will display the current strength setting. Rotate the STRENGTH dial to select your required Strength. 1 is the weakest and 8 is the strongest. We recommend starting on setting 4 for a medium strength coffee.
Adjust strength higher or lower to suit your taste.
NOTE
If using pre-ground coffee, rotate the STRENGTH dial to select the 'PRE-GROUND' coffee setting. This will disable the burr grinder. Add pre- ground coffee to the gold tone filter or a paper filter.
We recommend 1 level tablespoon of pre-ground coffee per 5oz/150ml cup of water. Adjust the amount according to your individual taste. The maximum capacity for pre-ground coffee is 12 level tablespoons. Exceeding this amount may cause overflow.
Press the START | CANCEL button. The grinder will commence grinding the correct amount of coffee for the selected brew size and strength. If the 'PRE-GROUND' coffee setting has been selected, the grinder will be disabled.
NOTE
Steam may emit from the rear steam vent during grinding and brewing.
This is normal.
The count-down timer will then begin.
The time displayed is an estimate only and will depend on the brew size and strength settings you have selected.
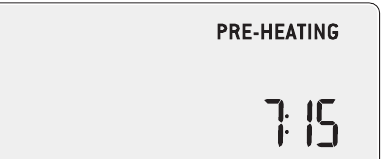
The LCD screen will display:


To stop the cycle at any time, press the START | CANCEL button. You will hear a winding noise. This is normal.
Never open the swing-out door and remove the coffee basket while brewing.
Hot water and coffee can cause injury.
The coffee basket and gold tone or paper filter may still be very hot after brewing. Use caution and allow to cool before removing.
Hot steam may rise when pouring. The bottom of the carafe is hot to touch for several minutes after brewing. Use caution and ensure not to set the carafe on a heat sensitive surface.
The Brew Pause feature temporarily ceases the flow of coffee when the carafe is removed so a cup can be poured mid-brew. Do not remove the carafe for longer than 20 seconds or the coffee may overflow the coffee basket.
Once the brewing cycle is complete, the ready signal will sound and a winding noise will be heard. This is normal. The coffee machine will automatically shut-off and the LCD screen will flash 'EMPTY COFFEE FILTER' as a reminder to remove the coffee basket and discard the used grinds. Wash the coffee basket, taking particular care to rinse the chute area. Then dry the coffee basket and chute area thoroughly.
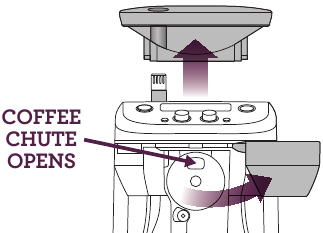
We also recommend checking the coffee grinds chute disc for any build-up of coffee grinds. This is the stainless steel disc that is visible when the swing-out door is opened.
A build-up of grinds on this disc can affect the performance of the machine. Wipe the disc clean then dry thoroughly.
Ensure the carafe lid is securely locked in position. There is no need to turn or adjust the lid before pouring. The lid automatically opens when pouring so as to keep coffee hot.
The LCD screen will go dim after 5 minutes of none operation.
Press to open the flip-top lid. Pour the desired amount of cold, preferably filtered water into the tank using a jug or the carafe. Never use Distilled, De-mineralized or highly filtered water as this will affect the electronics and the taste of your coffee.
The LCD screen will indicate the amount of water in the tank as it is filled. The machine will beep when full and the water level float will rise to indicate the maximum level. Do not exceed the 12 cup maximum. Doing so may cause water spillage at the back of the machine. Close the flip-top lid.
NOTE
Check the water level on the LCD screen before use. We recommend always keeping the water tank full. The water tank should be refilled with cold, preferably filtered water. Do not fill with any other liquid.
NOTE
Never pour water into the bean hopper or grinding chamber area.
Doing so can cause the grinder to clog. Only re-commence use when the grinding chamber and grinding burrs are completely dry.
Refer to Troubleshooting, 'Moisture clogging grinder'.
Never fill the water tank once the coffee machine has started a brewing cycle.
This will affect the volume dispensed into the cup.
A warm cup will help maintain the coffee's optimal temperature and keep coffee hotter for longer. Fill the cup with hot water for about 30 seconds then discard the water. Place the cup into position under the drip stop outlet.
TIP
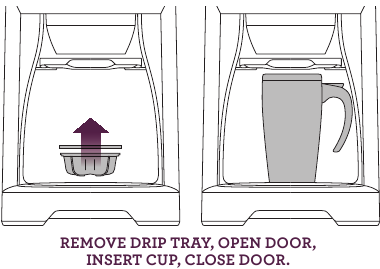
For taller cups and travel mugs, remove the drip tray at the base of the machine. Press the OPEN button to open the swing-out door. Insert the cup/mug into the drip tray cavity before closing the swing-out door. The maximum cup/ mug dimensions are 7.5" height, 2¾" diameter.
Press the CUP|CARAFE dial until the LCD screen displays the CUP symbol and the current cup size selected in ounces. Rotate the CUP|CARAFE dial to select the required size.
There are 7 size options to accommodate for different amounts or milk, half-and- half and creamer. Always ensure your cup is an adequate size for the setting selected.
The amounts displayed on the LCD screen are approximate only. Actual amounts may vary depending on the type of filter used, the coffee grind size, roast, blend and freshness, or amount and type of pre-ground coffee used.
There are 8 strength settings. The LCD screen will display the current strength setting. Rotate the STRENGTH dial to select your required strength. 1 is the weakest and 8 is the strongest. We recommend starting on setting 4 for a medium strength coffee. Adjust strength higher or lower to suit your taste.
NOTE
If using pre-ground coffee, select the 'PRE-GROUND' coffee setting. This will disable the grinder. Add pre-ground coffee to the gold tone filter or a paper filter. We recommend 1 level tablespoon of pre-ground coffee per 5oz/150ml cup of water. Adjust the amount according to your individual taste. The maximum capacity for pre-ground coffee is 12 level tablespoons. Exceeding this amount may cause overflow.
Press the START | CANCEL button. The grinder will commence grinding the correct amount of coffee for the selected brew size and strength. If the 'PRE-GROUND' coffee setting has been selected, the grinder will be disabled.
NOTE
Steam may emit from the rear steam vent during grinding and brewing. This is normal.
The count-down timer will then begin. The time displayed is an estimate only and will depend on the amount and strength settings you have selected. The LCD screen will display:


To stop the cycle at any time, press the START | CANCEL button. You will hear a winding noise. This is normal.
Never open the swing-out door and remove the coffee basket while brewing. Hot water and coffee can cause injury.
Once the brewing cycle is complete, the ready signal will sound and a winding noise will be heard. This is normal.
The coffee machine will automatically shut-off, however the LCD screen will flash 'EMPTY COFFEE FILTER' as a reminder to remove the coffee basket and discard the used grinds. Wash the coffee basket, taking particular care to rinse the chute area. Then dry the coffee basket and chute area thoroughly.
We also recommend checking the coffee grinds chute disc for any build-up of coffee grinds. This is the stainless steel disc that is visible when the swing-out door is opened. A build-up of grinds on this disc can affect the performance of the machine. Wipe the disc clean then dry thoroughly.
LCD screen will dim after 5 minutes of none operation.
The coffee basket, gold tone or paper filter may still be very hot after brewing.
Use caution and allow to cool before removing.
NOTE
If using the gold tone filter, you may notice the brewing cycle finish before the ready signal sounds. This is normal. The total brewing time displayed on the LCD screen is calculated using paper filters as coffee passes through paper filters slower.

The Auto Start feature allows you to program the specific time when the coffee machine will automatically turn on and start the grinding and brewing cycle.
You must set the clock to use the Auto Start feature. Always remember to reset the clock for time changes, power outages and when you unplug the machine.
NOTE
If you have not set the clock time, please follow the instructions below.

NOTE
The Auto Start feature must be selected each time you want to pre-schedule a brew. Press the AUTO START button and the programmed Auto Start time will display on the LCD screen. The Auto Start feature will not be activated unless there is adequate amount of water in the machine for the selected brew volume.
NOTE
Always remember to reset the clock and Auto Start time when there is a time change, power outage or after you unplug the machine.

The volume of the 'Ready' signal can be changed to suit your preference.
There are 3 options:
Press and hold Exit/Menu button for 2 seconds to activate standby mode.
Your Grind Control™ coffee brewer is equipped with some advanced features that usually only need to be used occasionally. These are outlined below:
Your Grind Control™ coffee brewer is fitted with Adjustable Stainless Steel burrs. These flat burrs deliver a coffee particle of optimum size for Drip Filter brewing. You may need to adjust the grind size to compensate for coffee of different origins, quality, age and degree of roast. Grind setting 3 should cover most coffees you purchase but there are circumstances that require the grind size to be adjusted.
We recommend you visually assess the grind size first. This can only be done by grinding some coffee and assessing the size. For smaller cup volumes (10oz) a finer grind will work best (setting 2-3) for larger cup volumes (12 cup carafe) a medium-coarse grind will work best (setting 3-5), but these are heavily dependent on many factors.
We suggest only making one adjustment at a time & determine its affects by brewing and tasting.
To adjust, turn the Grind Adjustment dial located through the bean hopper lid, in the direction of the arrow to effect a coarser or finer grind. The LCD will display your grind setting when you turn the dial. Turn the dial slowly until the Grind Size number is displayed.
NOTE
A grind size of between 2 and 4 should be suitable for most coffee origins & brew sizes. If using this range and your coffee is not tasting as expected, check the freshness of your beans. Also ensure the coffee basket, grinding chute and carafe are clean.
This function is used to adjust the grinder output times to compensate for coffee beans of different origins, age and degree of roast and grind size. To use this function you will require a set of precision scales with a resolution of 1 gram. When using this function the machine will require you to weigh the amount of output from the grinder after it runs for 10 secs.
We recommend you set the grind size you require first. This can only be done by grinding some coffee and visually assessing to the size. For smaller cup volumes (10 oz), a finer grind (2-3) works best; for larger cup volumes (12 cup carafe), a medium coarse grind (3-5) works best.
The grinder output is now re-calibrated to match your coffee beans origin, age and degree of roast. You can now experiment with different strength settings & grind size adjustments until you achieve the taste you require.
This is used to RESET the machine to the factory settings. These include the CLOCK, AUTO START ON time and the Grinder output times. If you have used the CALIBRATE function and the grinder output is unsuitable, use the RESET to restore the grinder output time to the factory settings.
Hold both the Cup/Carafe button and the Strength button down at the same time. The LCD will now toggle between ml and ounce indicators.
Always turn the coffee machine off and remove the plug from the power outlet before cleaning.
After every use, press the OPEN button to open the swing-out door. Remove the coffee basket. Discard the ground coffee and paper filter. The coffee basket and gold tone filter can be rinsed under running water. Make sure to thoroughly rinse the chute area of the coffee basket and ensure the fine holes of the gold tone filter are clear. For a deeper clean, wash the coffee basket and gold tone filter in warm, soapy water with a soft bristled brush.
NOTE
The flap on the side of the coffee basket is the steam baffle which assists with water overflow if the coffee basket becomes blocked. The flap is hinged from the bottom for easy cleaning. Pull the flap downwards to clean, however always click it back into the upright position before use.
The coffee basket, gold tone or paper filter may still be very hot after brewing.
Use caution and allow to cool before removing.
After each use, empty the carafe. Do not let brewed coffee stand overnight as this can cause the carafe to stain. Rinse the carafe and carafe lid under running water. For a deeper clean, we recommend regularly washing the carafe in warm, soapy water with a soft bristled brush (one can be purchased from Breville if you do not have a suitable one). Do not use abrasive cleansers, pads or cloths which can scratch the surface. Rinse and dry thoroughly.
Remove the hopper lid and turn the locking knob counter-clockwise in the direction of the UNLOCK arrow. The bean hopper and lid can be washed in warm, soapy water. Do not use abrasive cleansers, pads or cloths which can scratch the surface. Rinse and dry thoroughly.
NOTE
Do not clean any of the parts or any of the accessories in the dishwasher.
The LCD screen will display 'CLEAN COFFEE CHUTE' when the grinding burrs and coffee grinds chute need to be cleaned. We recommend doing this immediately to avoid clogging and overflowing of the coffee basket. Depending on frequency of use, you may choose to do this every 2-3 weeks.


The machine is now ready to use.
Press the OPEN button to open the swing-out door. Remove the grinds catcher located under the coffee grinds chute and the 2-part drip tray at the base of the machine. Wash in warm, soapy water. Do not use abrasive cleansers, pads or cloths which can scratch the surface. Rinse and dry thoroughly.
The outer housing and LCD screen can be cleaned with a soft, damp cloth. Apply cleanser to the cloth and not the LCD surface. Polish with a soft, dry cloth. Cleaning and drying with dry paper towels or abrasive cloths and cleaners may scratch the surface.
Your coffee machine may experience build-up from calcium and minerals contained in your water. This 'scale' or mineral build-up will affect the machine's performance and coffee quality. It is critical that scale build-up be removed. How often you de-scale will depend on the hardness of your water and the frequency of use. For best results, Breville recommends de-scaling once per month in soft water environments and more frequently in hard water environments.

If there is an excessive mineral build-up, the Descale function "dESC" will scroll across the screen.
Follow the step-by-step instructions below. Allow approximately 30-40 minutes to complete the entire descale process.
NOTE
You cannot stop the descaling process mid cycle. Force stop by unplugging the cord from the power outlet.
TIP
You may choose to use a household de-scaling agent instead of vinegar and water. Look for one that is designed for use with drip coffee machine and follow the manufacturer's instructions promptly.
The coffee basket is not in place.
Swing-out door is not closed.

Here you can download full pdf version of manual, it may contain additional safety instructions, warranty information, FCC rules, etc.